How to implement one-to-one mapping in Spring Boot?
Learn how to implement one-to-one mapping between entities using Spring Boot and Spring Data JPA with a simple example.


Introduction
In this tutorial, we are going to implement one-to-one mapping between objects in Java and use Spring Data JPA to automatically implement the mapping in a relational database (MySQL).
If you are learning Spring Boot then it is very important to be able to implement relationships between entities. It is a very common thing used in enterprise applications as data is almost always related and establishing a mapping between tables makes the data meaningful.
In relational databases, mapping is defined via foreign keys and using Spring Data JPA, we will be able to convert relations between objects to table relations. We will define the mapping between the objects and Spring Data JPA will use hibernate to convert the mappings into SQL queries to establish the relations in an actual relational database.
First, we will start with unidirectional one-to-one mapping and then move to bidirectional one-to-one mapping. So, let's get started.
Scenario
Consider a company named XYZ Enterprise where all new employees are given a laptop. Now, as the company is growing, it is getting tedious to manage the employees and their laptops. XYZ Enterprise needs an application through which they will be able to maintain the record of employees and their respective laptops. Lucky us, we have been tasked to implement this feature. These are the details that need to be recorded in the application:
Data to be stored for each employee:
ID
Name
Email
Laptop
Data to be stored for each laptop:
ID
Brand
Model
Understanding The Scenario
First, let's be clear with the mapping. Every employee will have only one company-provided laptop. So, this is a one-to-one mapping. Currently, we want to be able to find the laptop via the employee record i.e. which laptop belongs to which employee is stored in the employee's record which makes the mapping unidirectional.
Now that we are clear with the mapping, we have the following requirements to implement in our application:
Create a Spring Boot project with the below dependencies:
Spring WEB
Spring Data JPA
MySQL Driver
Configure the application
Create entities for Employee and Laptop
Create respective JPA respositories to be able to perform data manipulation.
Configuration
# MysQL configuration
spring.datasource.url=jdbc:mysql://localhost:3306/xyz
spring.datasource.username=root
spring.datasource.password=Souvik@123
spring.datasource.driver-class-name=com.mysql.cj.jdbc.Driver

# Hibernate configuration
spring.jpa.hibernate.ddl-auto=update
spring.jpa.properties.hibernate.dialect=org.hibernate.dialect.MySQLDialect

# To print SQL queries in logs while execution
spring.jpa.show-sql=true
Dependencies in pom.xml
<dependencies>
   <dependency>
      <groupId>org.springframework.boot</groupId>
      <artifactId>spring-boot-starter-data-jpa</artifactId>
   </dependency>
   <dependency>
      <groupId>org.springframework.boot</groupId>
      <artifactId>spring-boot-starter-web</artifactId>
   </dependency>

   <dependency>
      <groupId>com.mysql</groupId>
      <artifactId>mysql-connector-j</artifactId>
      <scope>runtime</scope>
   </dependency>
   <dependency>
      <groupId>org.springframework.boot</groupId>
      <artifactId>spring-boot-starter-test</artifactId>
      <scope>test</scope>
   </dependency>
</dependencies>
Creating The Entities
To store the data, we need to define the entity properties i.e. the Employee and Laptop properties. Considering every employee has 4 properties: id, name, email, and laptop and every laptop has 3 properties: id, brand, and model, their Java entity definitions are given below.
Laptop
@Entity
public class Laptop {

    @Id
    private Long id;
    private String brand;
    private String model;

    // getter setters here...
}
Employee
@Entity
public class Employee {

    @Id
    private Long id;
    private String name;
    private String email;
    @OneToOne
    private Laptop laptop;

    // getter setters here
}
Defining The Repositories
Laptop
@Repository
public interface LaptopRepository extends JpaRepository<Laptop, Long> {
}
Employee
@Repository
public interface EmployeeRepository extends JpaRepository<Employee, Long> {
}
Now, we need to create and insert data into the database to check if our application works. To do so, we will be implementing the CommandLineRunner interface. We are implementing the CommandLineRunner interface because it provides a run method where we can override to write our custom code.
@SpringBootApplication
public class HibernateMappingsApplication implements CommandLineRunner {

   @Autowired
   private EmployeeRepository employeeRepository;
   @Autowired
   private LaptopRepository laptopRepository;

    @Override
   public void run(String... args) throws Exception {

      Employee employee = new Employee();
      employee.setId(3342L);
      employee.setName("John Doe");
      employee.setEmail("harrytownsend@xyz.com");

      Laptop laptop = new Laptop();
      laptop.setId(11007023L);
      laptop.setBrand("HP");
      laptop.setModel("CX-1000XT");

      employee.setLaptop(laptop);

      laptopRepository.save(laptop);
      employeeRepository.save(employee);
   }

   public static void main(String[] args) {
      SpringApplication.run(HibernateMappingsApplication.class, args);
   }
}
Now, let's run the application and our application works! If you check your database, you can see that the tables have been created and the data has been inserted into them. Here are the snaps from my database:
Table: laptop

Table: employee

If you check the logs, you can see the SQL queries generated by Hibernate to establish the one-to-one mapping between the employee and laptop table.
create table employee (id bigint not null, email varchar(255), name varchar(255), laptop_id bigint, primary key (id)) engine=InnoDB

create table laptop (id bigint not null, brand varchar(255), model varchar(255), primary key (id)) engine=InnoDB

alter table employee add constraint FKjtd8nx6wd9p3cprlrn5r6omgs foreign key (laptop_id) references laptop (id)
Cascading
This is a property of @OneToOne annotation which allows cascade functionality. Currently, in our main file, we have to write 2 separate save() methods to save both the laptop and employee but if we define the laptop property as below in Employee.java
@Entity
public class Employee {
    // variables defined as above

    @OneToOne(cascade = CascadeType.ALL)
    private Laptop laptop;

    // getter setters as mentioned above
}
then whenever we insert the employee, the laptop data will be inserted automatically. Spring will see that in the Employee entity, Laptop is a dependency, so it will automatically save the laptop whenever the employee record is inserted.
Update your main file with the below code to see the cascade occur.
@Override
public void run(String... args) throws Exception {

   Employee employee = new Employee();
   employee.setId(6844L);
   employee.setName("Tom Hardy");
   employee.setEmail("tomhardy@xyz.com");

   Laptop laptop = new Laptop();
   laptop.setId(11007024L);
   laptop.setBrand("Dell");
   laptop.setModel("XPS-17");

   employee.setLaptop(laptop);

   // saving only employee but both employee and laptop will be saved
   employeeRepository.save(employee);
}
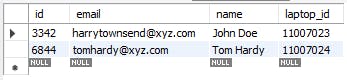
Table: laptop
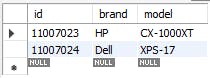
Table: employee
Bi-directional One-to-one mapping
Till now, we can know which laptop belongs to which employee from the employee table only. But what if we want to make this mapping a bidirectional one i.e. which laptop belongs to which employee can be determined from both the tables?
To do so, we will define a one-to-one mapping in the Laptop entity as we did in Employee.java.
@Entity
public class Laptop {
    // variables defined as above

    @OneToOne
    private Employee employee;

    // getter setters as mentioned above
}
Now, let's insert another record.
@Override
public void run(String... args) throws Exception {

   Employee employee = new Employee();
   employee.setId(7311L);
   employee.setName("Tony Stark");
   employee.setEmail("tonystark@xyz.com");

   Laptop laptop = new Laptop();
   laptop.setId(11007025L);
   laptop.setBrand("Apple");
   laptop.setModel("Macbook M2 Pro");

   employee.setLaptop(laptop);
   laptop.setEmployee(employee);

   employeeRepository.save(employee);
}
Table: laptop
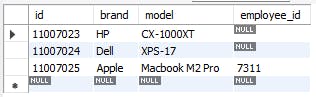
Table: employee
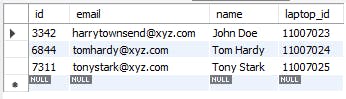
If you check the database then you can see that the data is inserted successfully. This brings us to the end of the tutorial.
Congratulations on learning one-to-one mapping in Spring Boot. If you want to see the code then you can click here to view it in my GitHub repository and if you found this helpful, please leave a like. It means a lot :)